Skip to content

Connect and find Help

FInd someone from the community to assist with your Lay Theme Website. May it be customization, support or maintenance.

112 Topics 374 Posts
  • This topic is deleted!

    1
    0 Votes
    1 Posts
    1 Views
    No one has replied
  • 3-tiered dropdown menu

    1
    2
    1 Votes
    1 Posts
    215 Views
    No one has replied
  • This topic is deleted!

    1
    1 Votes
    1 Posts
    36 Views
    No one has replied
  • Searching for Polylang Support

    1
    1 Votes
    1 Posts
    99 Views
    No one has replied
  • I need help with Polylang

    4
    0 Votes
    4 Posts
    693 Views
    RichardR
    Thank you Ben! @doorofperception I will be sure to make note of this! 🌝 Best wishes & have a wonderful day Richard
  • Custom coded Screensaver

    2
    0 Votes
    2 Posts
    239 Views
    K
    You got mail!
  • Custom cursor pointer for lightbox plugin

    5
    0 Votes
    5 Posts
    957 Views
    RichardR
    Dear @ErEs Great :) Thank you for updating Best Richard
  • Sticky element

    8
    0 Votes
    8 Posts
    2k Views
    RichardR
    Thank you for the update @Sophie1000 ! 🌝
  • Help plugin - Swap Images on Hover JS

    2
    4
    0 Votes
    2 Posts
    290 Views
    K
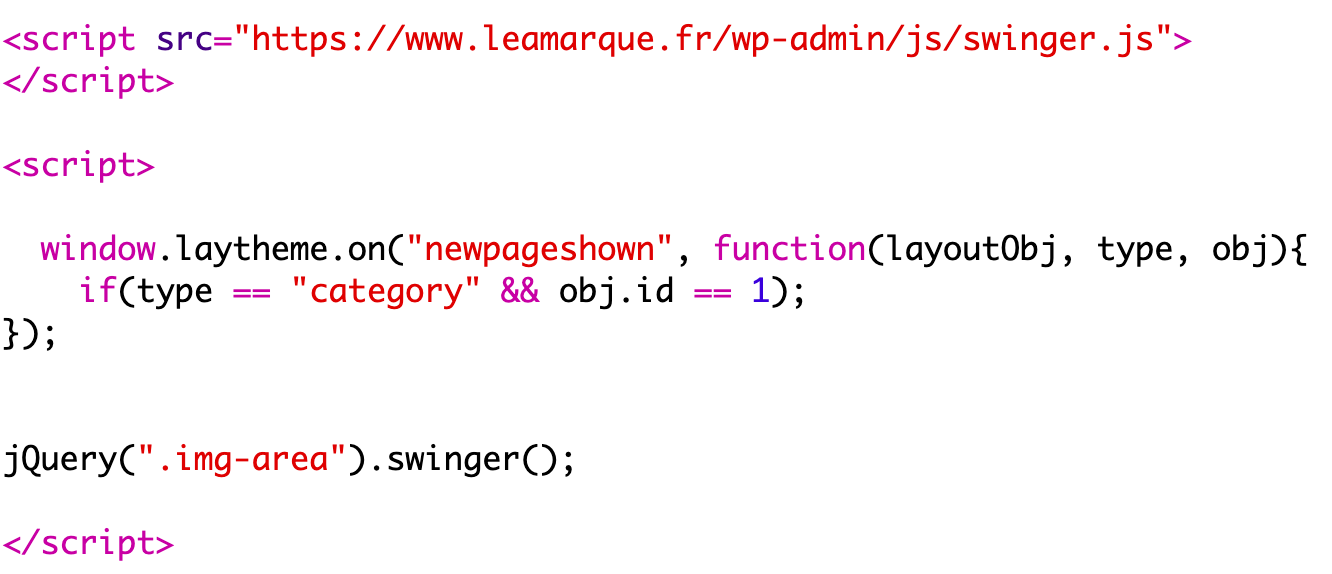
    Here you go! Put this in your custom js: <script> window.laytheme.on("newpageshown", function(layoutObj, type, obj){ jQuery.fn.swinger = function () { return this.each(function () { var $container = jQuery(this); $container.css({ "position": "relative" }); var $images = $container.find("img"); $images.css({ "position": "absolute", "top": "0%", "left": "0%", "width": "100%" }); var $middleImage = jQuery($images[Math.floor($images.length / 2)]); $middleImage.css({ "z-index": "2", "position": "relative" }); var columnsCount = $images.length; $images.each((i, img) => { var left = `${100 / columnsCount * i}%`; var width = `${100 / columnsCount}%`; var $column = jQuery(`<span style="z-index:999;position:absolute;top:0;bottom:0;left:${left};width:${width}"></span>`); jQuery(img).after($column); $column.hover(() => { $images.css({ "z-index": "1", "position": "absolute" }); jQuery(img).css({ "z-index": "2", "position": "relative" }); }); }) }); } }); </script> <script> window.laytheme.on("newpageshown", function(layoutObj, type, obj){ jQuery(".img-area").swinger(); }); </script> Then add your images via "+More" > +HTML" in your laygridder. Give the row the class "img-area". Should work like this.

  • LAYOUT FIXER

    5
    0 Votes
    5 Posts
    688 Views
    RichardR
    Awesome @DasBlitz @kalamakumaran Thanks for using the 3rd party developers section, Good Luck! :)
  • Click on active menu point to go back to landing page

    2
    0 Votes
    2 Posts
    280 Views
    F
    @Richard maybe you can give me a clue for this issue?
  • This topic is deleted!

    1
    0 Votes
    1 Posts
    10 Views
    No one has replied
  • Hover over image - text (image title) tooltip that follows cursor

    2
    0 Votes
    2 Posts
    1k Views
    RichardR
    Dear @Iman-Whitfield If it helps you, here is the tooltip.js in your example for you: function initTooltip() { const tooltips = Array.from(document.querySelectorAll('[data-tooltip-container]')); tooltips.map(tooltip => { tooltip.addEventListener('mouseover', handleMouseOver); }) function handleMouseOver() { const tooltipbox = createTooltipBox(this); handleMouseMove.tooltipbox = tooltipbox; this.addEventListener('mousemove', handleMouseMove); handleMouseLeave.tooltipbox = tooltipbox; handleMouseLeave.element = this; this.addEventListener('mouseleave', handleMouseLeave); } const handleMouseLeave = { handleEvent() { this.tooltipbox.remove(); this.element.removeEventListener('mousemove', handleMouseMove); this.element.removeEventListener('mouseleave', handleMouseLeave); } } const handleMouseMove = { handleEvent(e) { this.tooltipbox.style.top = e.clientY + 25 + 'px'; this.tooltipbox.style.left = e.clientX + 13 +'px'; } } function createTooltipBox(el) { let tooltip = document.createElement('div'); tooltip.innerText = el.getAttribute('data-tooltip-label'); tooltip.classList.add('tooltip'); document.body.appendChild(tooltip); return tooltip; } } initTooltip(); Creating a box, <div>, that appears when hovering over the Image <img> is a simple step. Here are some links that may help you: https://www.khanacademy.org/computing/computer-programming/html-css https://www.khanacademy.org/computing/computer-programming/html-css/web-development-tools/a/using-the-browser-developer-tools https://www.w3schools.com/howto/howto_css_display_element_hover.asp However the next step: You will need the Image Title information which is stored as an Attribute to the Image element This information will be used to fill the Tooltip with text. These Links may be of help to you: https://www.tutorialrepublic.com/faq/how-to-get-the-data-id-attribute-of-an-element-using-jquery.php#:~:text=Answer%3A Use the jQuery attr,attribute of an HTML element. https://laytheme.com/documentation.html#custom-javascript https://css-tricks.com/a-complete-guide-to-data-attributes/ Sorry that i cannot be of more help right now Iman but i hope this aids either you or someone helping :) Best wishes & thank you for using Lay Theme Richard
  • Auto-Scroll to Row

    4
    0 Votes
    4 Posts
    633 Views
    RichardR
    Dear @Phearhead Wondering if something like this is helpful? https://stackoverflow.com/questions/25839487/auto-scroll-to-next-anchor-at-mouse-wheel Best wishes Richard
  • Submenu (dropdown) for mobile responsive

    4
    1
    0 Votes
    4 Posts
    694 Views
    RichardR
    Dear @karimus1888 I do not know for certain though i'm sure it it possible. I will have to test with Polylang myself. Sorry that i cannot be of further help right now :) Sincerely Richard
  • Vertical Menu with Unfold/Fold-Option for Sub-Menus?

    5
    2
    0 Votes
    5 Posts
    961 Views
    S
    I solved it with Custom CSS. Thanks for the Answers!
  • 0 Votes
    2 Posts
    388 Views
    RichardR
    Dear @MickeyB Apologies for the delay - Happy to help :) The Background Color of your Grid is currently set to black: #000000 This can be changed to transparent which will allow users to see the video behind. This can be done within Customize > Background > Background Color > Also your 'Cover' has a white background color set: #ffffff If for whatever reason you need CSS Code to force the background color change then please add the following to either Customize > CSS Or within Lay Options > Custom CSS & HTML > Custom CSS .cover-content { background-color:transparent;} #grid{ background-color:transparent; } Unsure if you want this as well - On Armin's test, he has a background-color: .row { background-color: rgba(0,0,0,0.9)!important; } Making the background almost Opaque similar to Opacity If i can be of further help Mickey, let me know & have a wonderful day, Thank you for using Lay Theme :) Best Richard
  • Eliminate footer and header menu "structure" only for a specific page

    4
    0 Votes
    4 Posts
    330 Views
    RichardR
    Dear @gab The right-click & inspect function of your page is not working so looking at the Code structure isn't possible right now, this page outlines some likely reasons: https://www.auslogics.com/en/articles/fix-right-click-not-working-on-chrome-and-firefox/ I will try my best to set you in the right direction though :) We will be using some of the things outlined within Laytheme's Documentation - specifically targeting a certain page: https://laytheme.com/documentation.html#custom-css-styling Each page has a unique 'slug' which is typically the same as your URL address for the page. So im assuming yours is: .slug-stories With this, CSS applied will only target the 'stories' page. Next we need the Header and Footer's Class or ID. For the header we have the class: .lay-nav & for the Footer we have the ID: #footer-region With this info we can say this: .slug-stories .laynav, #footer-region { display:none; } Saying: -- .slug-stories (stories page) the laynav (navigation) & #footer-region (footer) are to - 'Display:none' The Custom Code above can be inserted into the Custom CSS area of 'Lay options -Custom CSS & HTML' [image: 1614377621436-screen-shot-2020-09-14-at-2.51.54-pm-resized.png] Hope this helps & have a wonderful day :) Richard
  • Remove menu from landing page

    2
    0 Votes
    2 Posts
    477 Views
    RichardR
    Dear Michael @MickeyB Lets do that! :) This may help you as well - referring to Custom CSS based on the landing page: https://laytheme.com/documentation.html#custom-css-styling The following Code will be applied/added to the CSS area within 'Lay Options - Custom CSS & HTML' or using the CSS area located in 'Customize' ( they have the same result ) Your homepage has a 'slug' ( typically the same as your pages URL ) .slug-homepage So we can target this page only and apply css to it. Within this page we want to target both the 'laynav' which is the menu items and also 'navbar' which is the actual 'bar' that separates the Navigation items, so we have our needed elements. Target Homepage then the Laynav and Navbar within: .slug-homepage .laynav, .navbar { display:none !important; } Display:none - straight forward; we tell it not to display and we add the !important to override any CSS that is given naturally from LayTheme ( the CSS that would apply to all other pages etc ). Here is a screenshot of result: [image: 1613710531553-screen-shot-2021-02-19-at-5.55.04-pm-resized.png] Hope this helps Michael and let me know how you go, Have a wonderful day :) Sincerely Richard
  • custom project thumbnail grid

    1
    1 Votes
    1 Posts
    136 Views
    No one has replied
Online Users
Forgot your key, lost your files, need a previous Lay Theme or Addon version? Go to www.laykeymanager.com